Welcome to my Blog.

Translate my Posts easily.

Welcome to my blog.

I'll be posting thoughts, photos, happenings, and other art
related information from time to time.


If English is not your most comfortable language please use
the Google translator on the right for fast translation of my Posts.

Thank you.

venerdì 27 settembre 2013

The Birth of a Flower….


View strelizia sequence

view Full Album

Here is a sequence of fotos documenting the progress of my precious flower.  As of today we are starting to see the orange color of the flower around the edges of the green spike. I spray it with water, (it likes humidity), twice  a day and look at it at least a million times.  Crazy?  Yup!!! And I've contaminated at least 5 other people in the condominium. Here in Italy, when a baby is born, the family attaches a huge bow on the door of their home, blue for a boy and pink for a girl.(obviously) What color should we put on our door for my flower?  Orange - color of the flower???  Or ???? . . . to continue. . . . .

mercoledì 25 settembre 2013

Print #3 and the Strelizia Saga

inked plate ready for printing


 Print #3 - (plate)
 the plate was inked with etching inks
      cleaned with gauze in various areas
                 and on all four edges.


print #3


strelizia flower forming


Print # 3 -

 Note how much of the ink printed is a
 pastel.  This is because I "cut" the
 color with a transparent ink not white.


The Strelizia Saga . . . . .

This is today's picture of my flower to be. You can see now how it's forming at the top. Thank goodness the weather is holding out. It is still warm and sunny in Florence but the evenings are cool.


martedì 24 settembre 2013

Art and Botany - Time Out from Printing

Thumbnail for version as of 12:40, 13 September 2008
what the  flower should look like ...if. . .!!
Time out to  talk about what's happening in the studio behind the scenes.


 For weeks, . . . months now. . . something very exciting  is happening at the studio.  It has nothing to do with painting, printing or the like . . . even though it is a work of art that I'm talking about . . . it's art by  good old Mother Nature.

About 5 years ago, maybe 6, I bought a  little plant at the supermarket. The plastic pot, only 3 inches in diameter, housed a tiny "Strelizia" or  "Bird of Paradise", very exotic and one of my favorites.  There wasn't any real hope on my part that I would ever see it grow let alone flower but I bought it anyway. Everybody knows what that's like.

I'm afraid I wasn't very careful about the way I treated it at the beginning.  I slapped into an "any-old" kind of  vase not even considering that it would need good soil. It stayed in my garden for a couple of years where the temperatures during the winter are much more rigid than in Florence. When finally it started to show signs of growth, I decided to move it into the "tropical" temps of the city (the studio) where I put it in a larger pot and this time gave it fertle soil.

Low and behold,  after all these years, ( they say it takes at least 5), I think it's ready to BLOOM! Can hardly believe it!

I've been monitoring it for the past weeks, ever since it shot up a tall spike that could be a leaf  but is taking too long to open up. My hopes soar at the thought that it really is a flower. Every morning,  after I arrive at the studio,  my first stop is the courtyard to check the plant and/or flower.

Only then, after careful scrutiny and great discussion, (with husband, son and husband's secretary,  participants in this waiting) I go into the studio to work.

It's difficult to know how long the birth of this flower will take but. .  we should be close . . . (anyway, what do they say? Patience? it's a Virtue) After 5 years I can wait  a few more days?!?!?!

my plant. . . note "spike" at center


lunedì 23 settembre 2013

A Series. . . Monoprints

basic plate with tape
 I was very meticulous this morning about my printing - again using the basic taped plate #2. I dampened more paper. . . mixed my colors. . . and  began to paint on the plate, adding and removing color until my image was ready. I carefully covered all four edges  of the plexiglas with clean masking  tape to protect and to keep the edges clean. This tape will be removed just before I print maintaining the plate as clean as possible.

I removed the masking tape . . .   placed the plate on the register . . carefully positioned my dampened paper over the plate and register . . . and  then proceeded to run all under the roller of my press.

Below is  final print #2 , using etching ink thinned with linseed oil. There is no similarity between the image shown in the previous post using the same plate. This can happen.  The pressure was very light on the first printing  therefore the image was very uniform and light. I used wax pastel to accentuate some details after the print was dry.

final print #2

 This is a completly different image (above) although I used the same plate. Here the color was painted onto the plate with brushes following the lines of the tape.  To create lights and  to blend the colors I  partially removed some of the ink with gauze .

inked plate after printing.
The plate has almost totally lost its load of color.  I like this delicate image.  I could have tried to print this again but probably there wasn't enough ink left. It could be a stepping stone for tomorrow.

sabato 21 settembre 2013

New Monoprint and New Error


new monoprint
This is the print of the second plate where tapes of various widths and thicknesses are fixed to the plate itself to add imagery and texture. Once it was inked the plate was run through my press. But I made another mistake. . . The pressure was not strong enough.  I was used to the thickness of the previous plate and "forgot"!!! to adjust my pressure. This is interesting, but the colors are not what I had intended.  Will try again on Monday with more color and more pressure.

lunedì 16 settembre 2013

Inking Plate Using Brushes and Printing Inks


Using the same plate, by changing  the way  the color is applied and the range of colors used, the images are similar. . . not exactly alike, but similar. The prints could be used as a series.


this time the  plate was prepared using brushes to apply printing ink


 the resulting print

mercoledì 11 settembre 2013

Monotype or Monoprint? What’s in a Name

plate 1
plate 1
plate 2
plate 2
I’ll be using these two plates for the next printing sessions. Note that they are both covered partially with masking tape to create texture as well as imagery and, because this tape will remain permanent, the prints will change their names.  What’s the difference?

Monotype vs Monoprint . .  .
A monotype is neither a print nor a painting but a combination of both. It is one image, painted or drawn  with various mediums, oil or water based, onto a clean plate.The image is then  transferred to paper. A monotype plate is unworked, has no scratching or carving on  its surface. It produces a single image and cannot be reprinted. My first prints were monotypes.
A monoprint is, however, a print made using a plate that has already been worked on either by etching, collage, or lithography. The image will still be one of a kind but there is greater possibility to create a series, an edition of similar images. My next prints will be monoprints because, as you see, the plates have been worked on with tape. The main image in each will be similar.
4th  monoprints 005  plate 1 (on the right above) inked before printing
4th  monoprints 006 the print

martedì 10 settembre 2013

New Plates, New Names

Just want to show you some  steps in printmaking that are essential. Below is the photo of my stack of absorbant cardboard. After my  print is made, since the paper is still damp, I place it between these cardboard sheets until drying is complete. Otherwise the paper will curl up. The print has to be protected by tissue paper until the ink has completely dried.


This is the register as I've explained.  It is the tracing of one or more plates that are in use at the moment.
Drawn on a sheet of paper the same size as my final print, measuring carefully to find the center, the plate is quickly placed withinin the boundaries for easy printing.


Below is the next plate that I will be using.  It is still made of Plexiglass but you will note that I have partially covered some areas with strips of masking tape. Disregard the color that you see, that's just old ink that is on the back of the plate.  This plate will be inked and printed as I have done before but, because the tape is not removable,
the print takes on a new name.

detail of tape on new plate
tape covers new plate


lunedì 9 settembre 2013

Printing Session Day #3

inked plate ready to be printed

Today's print was done using brayers or rollers.  Each color was applied with a roller of a different size, charged with ink which was then applied to the plastic plate.  I am still using the same plate as I did with the preceeding prints. It is smooth, without cuts or etchings of any kind.


the plate placed on the register and the finished print


 Before a plate is printed, a register  has to be prepared.  This is nothing more than a sheet of paper the same size as the paper that will be used to make the final print. An outline of the plate, carefully centered, is traced clearly on this sheet to serve as a guide to the placement of the inked plate. The paper that will recieve the image is carefully placed over the register and plate so that  the print will always be centered perfectly.


finished print - day 3

Here is today's print.  Ready to be covered with clean tissue paper and stored in my stack of absorbent cardboard to dry. 

Nothing left for today but to clean up, probably the most tedious but the most important part of a session in the studio. If the paint or ink is allowed to dry on the palette or, in my case, the stone, it will be much harder to remove later. Using turpentine, or better yet gasoline, the colors are removed from all utensils as well as the  stone.( Be sure to open windows as you clean.) I left some of the inks that were still in good shape, sprayed them with water and covered with Saran Wrap.

scrape color off with a metal spatula

spray with water and cover with pastic wrap
Back tomorrow with another session.  This time I'll be using new plates.  Tell you more tomorrow . . .

venerdì 6 settembre 2013

Printing - Day #2


plate and print  still on the press
    
plate inked
                                                           
 
printed image #1

plate #2 and  print still on the press


final printing #2

 Today things went much better. All the preliminaries were done the other day so today I concentrated on printing. The inks were still usable because I had covered them carefully after the last session. I cover with a spray of water and then lay some Saran Wrap on top.  This works for a couple of days anyway. I adjusted the pressure on the press to make sure that there wouldn't be any more creasing of paper or squishing of ink.

 I also made double sure that there were no globs of ink that would spread under the press and tried to be as neat and clean as possible. Printing is a messey, messey job so you either like it or you don't. I have always loved to get my hands into all that guoopy paint so I rely on a pair of  good gloves muster up some  patience and hope that the result will be a clean image.

I did do a little experimenting today. By pouring and spraying turpentine on my inked plate I achieved effects close to watercolor washes.


giovedì 5 settembre 2013

Learning from Mistakes! Print # one

sponge, plastic wrap, Fabriani paper
This morning I prepared my paper by sponging each sheet thoroughly on both sides and placing  the sheets in a plastic envelope that  completely enclosed them on all four sides. Any plastic  bag would do well as long as the paper is completely covered. Left to rest while  everything else is prepared, the paper will absorb the water evenly and I'll be able to print.


(clockwise)  two hand brayers, wooden roller, ink fish bone
 Then I got out all the  printing utensils I have that are alternatives to the etching press. Remember, I have an idea to print by hand at some point.


etching stone and various spatulas
These are a variety of spatulas  used to mix and soften the inks as well as to apply colors to the printing plate


colors are laid out on the stone as a palette and will be mixed for use on the plastic plate


I set out the primary colors, plus white, black and a transparent ink that serves as a thinner in the sense that it cuts the tint of the ink without thinning its consistency. Then I proceeded to mix my colors employing oil and turpentine to thin the inks into "washes" where needed.


The plate after inking


After my image was ready, I carefully cleaned the beveled edges of the plexiglas plate with a soft rag. I didn't want any ink to  ruin the edges of the printed image. (famous last words!!!) This is a step that is necessary in any printing process.
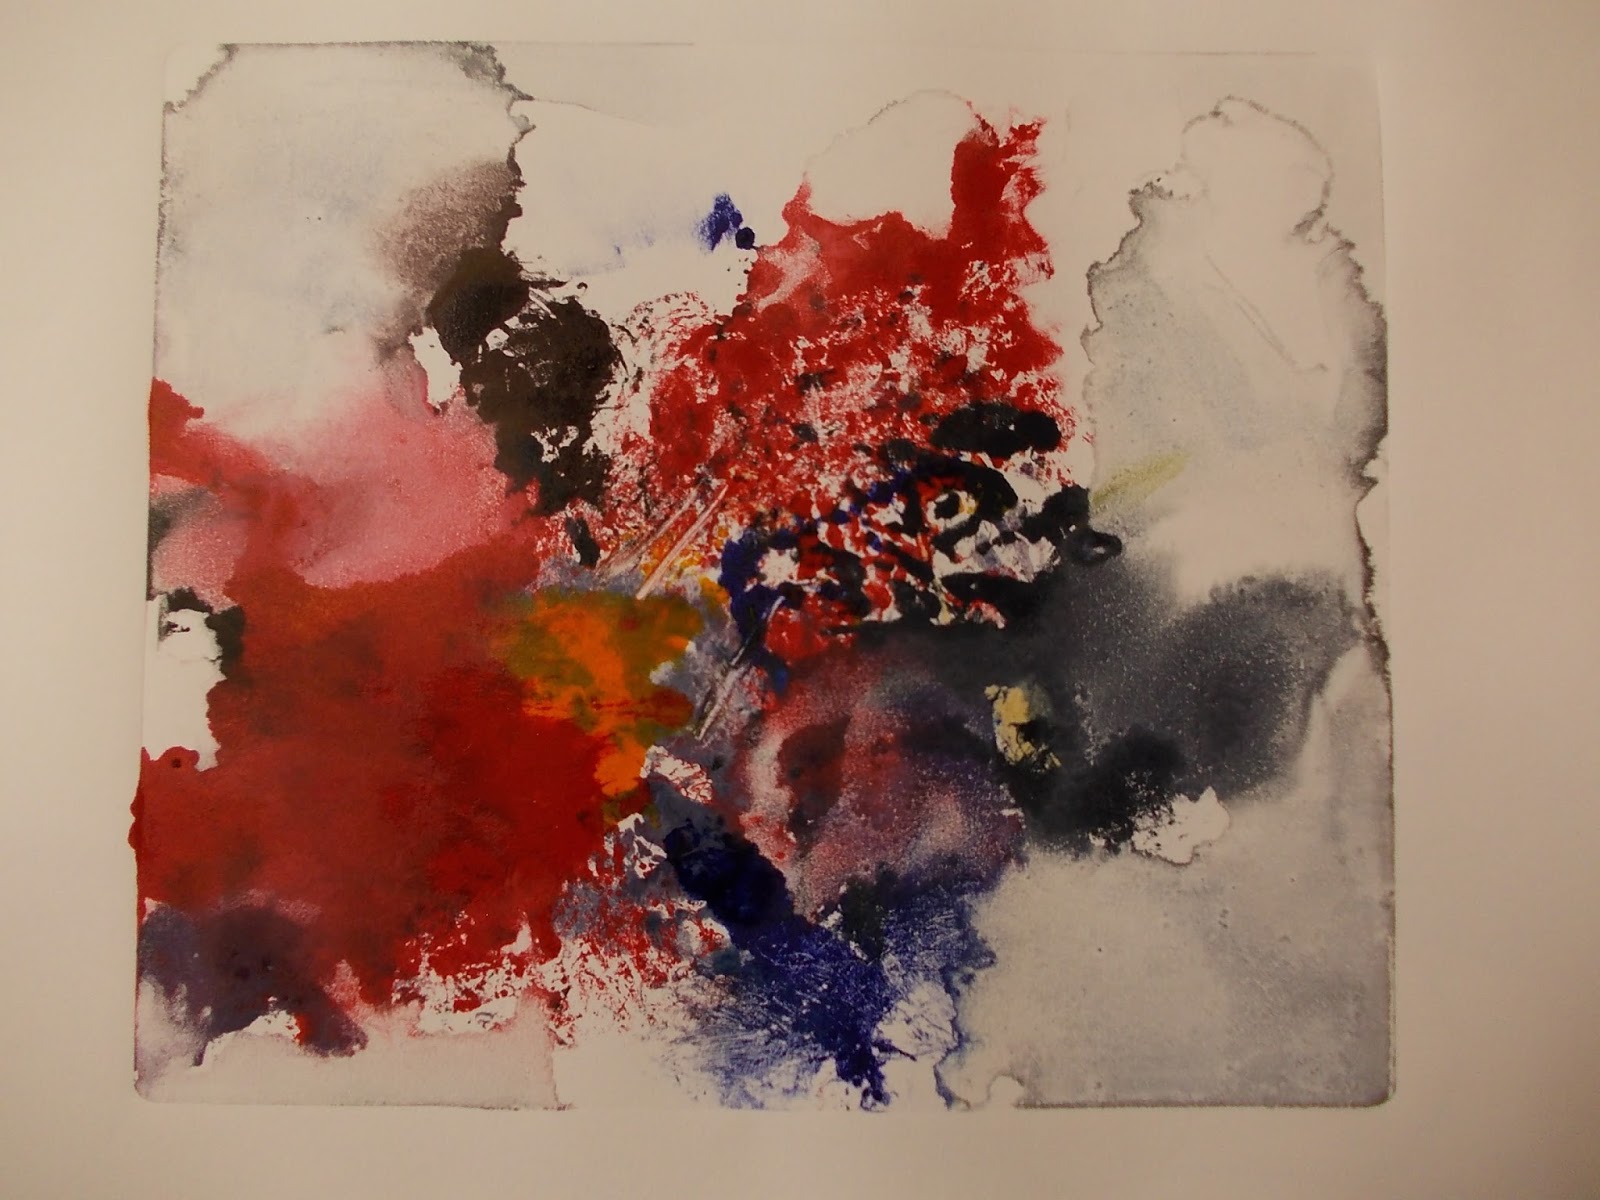
print # one
OK. This is the first print. A failure . . . I didn't follow my own  rules!! (even though I realized what I was doing!!!)  Maybe I was in too much of a hurry?

Note:  the printed image is the reverse of the image on the plate which is usual in a print but, to the right, see how the ink of the print has run out onto the paper beyond the edge of the plate. There was too much ink on the plate at that point and, under the pressure of the press, the ink was squeezed out from under the plate onto the margins of the paper dirtying the image. And, looking more closely, the color at  that point is flat. The texture that was there and  the application of another color that was there were cancelled by  the thick blob of blue that got squished under the pressure of the press.

AND, although it doesn't appear in my photo, there's another blemish. . .the white margine of  the   paper has a huge crease to one side indicating that the pressure of the press was too strong. As the cilinder passed over the plate, the paper buckled and creased under it's weight.

The only way these errors can be corrected is by hiding them under a passepartout . . .  It's much much better, however. to start over again, vowing  never again to make the same stupid mistakes.


martedì 3 settembre 2013

Mono . . . Printing!


washing up
dusty plexiglas plates

I’m looking forward to my new project with monoprints. Spent the day in the studio preparing  my materials. Cleaning came first.  I have  plexiglass plates that were prepared months ago and were covered by a thick layer of dust. They had to be washed carefully.  For any type of printing the first step to remember is to have a CLEAN plate, ready to receive the ink.
 

Then I set up the table where I'll ink my plates and store the paper which I wet beforehand. This is my choice.  There are printers that prefer not to moisten their paper but I feel  that damp paper absorbs the color better.


 I found my printing inks. Some are lithographic and some are calcographic (used for etching). I stacked them close to the old  lithographic stone that I use for mixing colors and put my linseed oil and turps close by.  Printing inks are stiff and need to be softened by using either oil or turpentine along with  good hard mixing with a spatula. Both thick color and fluid color can be used for monoprinting. All  depends on what effects are desired.


Sorry my litho stone is covered.  Will take a better photo next time.

litho inks
etching inks


Tomorrow I'll start to print and am toying with the idea  NOT to  use my press but to do some by hand.  It's all in experimenting right?   That's the fun of it.


the press is ready